Virtualization
- There are some virtualization and cloud material in this resume that could be added to the wiki.
Computer hardware virtualization
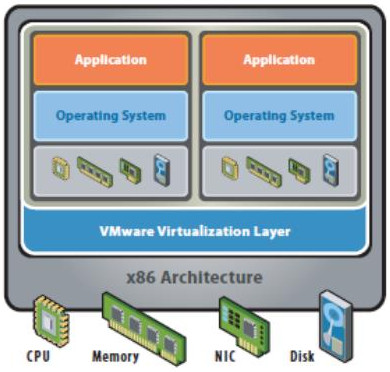
Hardware virtualization or platform virtualization refers to the creation of a virtual machine that acts like a real computer with an operating system. Software executed on these virtual machines is separated from the underlying hardware resources. For example, a computer that is running Microsoft Windows may host a virtual machine that looks like a computer with the Ubuntu Linux operating system
In hardware virtualization, the host machine is the actual machine on which the virtualization takes place, and the guest machine is the virtual machine. The words host and guest are used to distinguish the software that runs on the physical machine from the software that runs on the virtual machine.
Contents
Virtualisation
Virtualisation Advantages:
- Sharing of resources: It reduces cost.
- Isolation: Virtual machines are isolated from each other as if they are physically separated.
- Encapsulation: Virtual machines encapsulate a complete computing environment.
- Hardware Independence: Virtual machines run independently of underlying hardware.
- Portability: Virtual machines can be migrated between different hosts.
Virtualisation Model:
- Hardware-independence of operating system and applications
- Virtual machines can be provisioned to any system
- Can manage OS and application as a single unit by encapsulating them into virtual machines
Disadvantages of the traditional App/Server Model:
- Single OS image per machine
- Software and hardware tightly coupled
- Running multiple applications on same machine
- Underutilized resources
- Inflexible and costly infrastructure
VirtualBox
Installing VirtualBox
Before installing
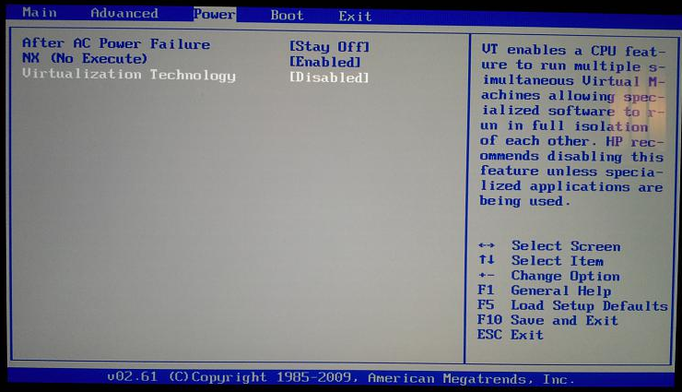
- Podría ser necesario activar la virtualisation en el BIOS. Generalmente en the Security Section in the BIOS there is a Virtualization option.
- If the Virtual Box Manager only gives 32bit option for Ubuntu when trying to boot mint this is most likely that virtualization is not enabled your bios.
- Otra cosa muy importante es disable Secure Boot en el BIOS. If Secure Boot is enable, we'll get an error when trying to create a VM.
Installation
Descargar VirtualBox (Oracle) desde la página Oficial: https://www.virtualbox.org/ Aquí para Linux: https://www.virtualbox.org/wiki/Linux_Downloads
La instalación se realiza a través de un GUI.
VirtualBox también se encuentra en los repositorios de Ubuntu:
sudo apt-get install virtualbox
Sin embargo, es apropiado instalar la última versión disponible en el sitio oficial. Los repositorios muchas veces están desactualizados.
Virtual Box Guest Additions
The Virtual Box Guest Additions allow you to do 'drag and drop' to add files to your virtualized operating system. Es decir, permite pasar archivos desde el SO instalado en la computadora y la VirtualMachine.
- From the «Devices» menu of the Hypervisor (correspondiente al VirtualBox) chose «Inset Guest Additions CD image».
- Se debería crear un Auto Run en el Escritorio que permite Instalar el programa. Si no se crear debemos ir a:
- Computer (donde se encuentra el Local Disc C:). Aquí, en el menú «Devices with removable storage» se encontrará «CD Drive (D:) VirtualBox Guest Additions» haciendo doble click ahí se abrirá el instalador.
- Luego de instalarlo y reiniciar la computadora, vamos a: Devices > Drag and Drop (Enable the Drag and Drop feature).
- Restart the OS another time.
- Listo... We should now be able to Drag and Drop files and folders from the Host OS to the Guest OS.
Instalación de Windows Server 2008/Ubuntu en VirtualBox
Descargar Windows Server 2008 Standard desde la página de Microsoft: https://www.microsoft.com/en-us/download/details.aspx?id=5023
How to Install Ubuntu in VirtualBox: https://helpdeskgeek.com/linux-tips/how-to-install-ubuntu-in-virtualbox/
Para crear una VirtualMachine en VirtualBox:
- Click on New
- Para que los archivos de la VM se creen en el directorio deseado. Antes de "Click on New" debemos ir a: File > Preferences: Default Machine Folder. Y especificar la ruta en donde queremos que se cree la VM.
- Name and operating system:
- Name: vamos a crear dos VirtualMachines:
- Una actuará como el Server - lo vamos a llamar: DC2017279
- La otra será el Client - la vamos a llamar: Client2017279
- Type: Microsoft Windows
- Version: Windows 2008 (32 bit)
- Name: vamos a crear dos VirtualMachines:
- Memory size (Adjust the amount of RAM): Use 768MB if your PC only has 2GB RAM Use 1GB (1024MB) if your PC has 4GB or more.
- Hard drive:
- Create a virtual hard drive now (the recommended size of the hard drive is 25.00GB)
- Hard drive file type: VDI (VirtualBox Disk Image)
- Storage on physical hard drive: Dynamically allocated
- File location and size:
- Location: Lo he creado en este dierectorio: ~/1-disco_local/.archivos_programas/virtualbox_hard_discs
- Name: Le coloqué el mismo mombre de la VirtualMachine: DC2017279
- Size: Lo que recomendaba el menú: 25GB
- Luego del paso anterior, estará creado el «shell» for the OS - The shell says «Powered Off». We will now install Server2008:
- Click on Settings
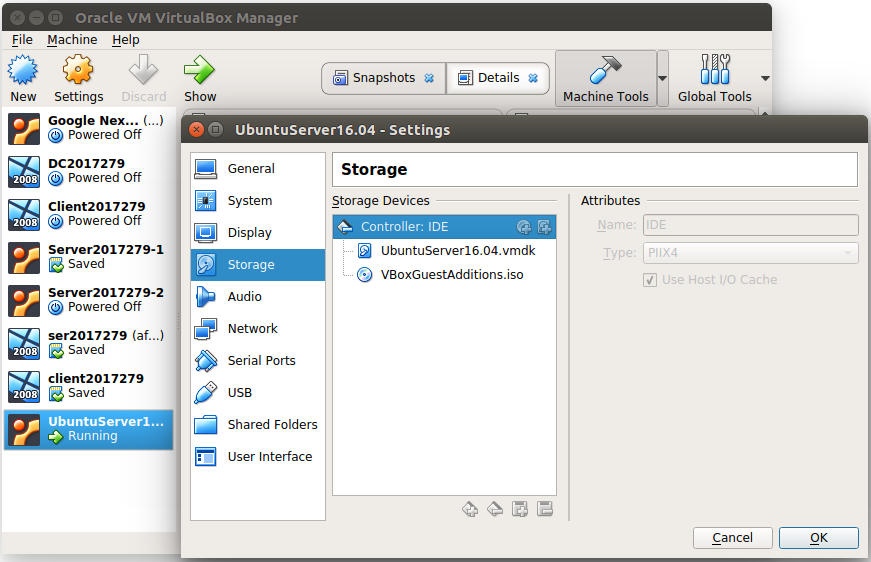
- Click Storage:
- Important: Delete the Empty disk (esto lo puso el Prof. en las láminas. No sé si de verdad es necesario)
- Important - Linux: IDE
- Aquí puede ser necesario borrar el SATA y luego asingar al IDE el virtual disck (UbuntuServer16.04.vmdk) a través de la opción "Add new Storage". Luego se debe asignar la imageUbuntuServer.ISO para realizar la instalación como mostramos a continuación. Podría también se necesario (en caso de que no se muestre el Storage Controller adecuado, adicionar el correcto a través de la opción "Add New Storage Controller".
- Important - Windows: Create SCSI, not IDE (En mi caso no se mostraba ninguana opción SCSI, en lugar se mostraba la opción SATA que fue la que escogí). Esto funcionó pero podría también haber adicionado el Storage Controller SCSI a través de la opción "Add New Storage Controller".
- Click Add CD/DVD Device (Add optical drive):
- Click on «Choose disk» and point to the ISO image in your ISO Images folder and click Open
- Click OK para guardar los cambios y salir del menú Settings
- Click Storage:
- Click Start
- Your screen will say Windows is loading files (this means the OS in installing)
- Choose English (Irish) for your language, hit Next or Okay, then choose Install Now
- We are using the 180 free trial evaluation so you do not need to enter a product key: choose No and then choose Next
- Next choose the Enterprise version (the full version and NOT the Core version)
- Accept the license and click Next
- Choose Custom for your installation then click Next and you will be able to install the OS onto the 25GB partition that has been created on the Virtual Hard Disk Drive
- Luego que el OS is installed you must set the Administrator password: Usaremos: pass1234!
- Note: Note: When you want to log on the Server will ask you to enter <CTRL> ALT> <DELETE> That has to be done without having the Task Manger start up so. Para esto debemos ir a la opción «Input» en el menú superior > Keyboard > Insert <CTRL> ALT> <DELETE>
- Click on Settings
Conectar una VM to the Internet
La primera vez que instalé Ubuntu Server en una virtual Machine tuve que realizar la configuración mostrada a abajo para que la VM se conectara a Internet. After that our VM’s automatically received an ip from our AP and were able to connect to the Internet. En este caso la IP address que fue asignada a la VM concordaba con la IP address de la host Machine. Es decir, si la IP address de la host Machine era 192.168.10.7, la que se le asignaba a la VM era 192.168.10.8. Lo que indicaba que una IP address de nuestro AP estaba siendo asignada a nuestra máquina.
Sin embargo, la segunda vez que instalé Ubuntu Server en una VM, no tuve que realizar ninguna configuración y la VM se conectó automáticamente al Internet. La configuración por defecto en este caso era:
En Machine (VirtualBox menu) > Settings > Network >:
Attached to: NAT
Ahora, en este caso, la ip addresse asignada a la VM (10.0.2.15) no tenía ninguna relación con la IP de la host machine.
Primera configuración realizada:
https://www.youtube.com/watch?v=nx4kBtKS9Bw
En mi Ubuntu-VM, tuve que configurar la Virtual Network (VitualBox Settings > Network) de la siguiente forma:
- Adapter 1:
- Attached to: Bridget Adapter
- Name: nobre de la interface de la host computer que proveerá el accceso a internet
- En Advanced:
- Promiscuous Mode: Allow All
- La opción de Cable connected se mantiene seleccionada.
- Se debe también corroborar que todos los demás campos son correctos.
- Adapter 2:
- Attached to: Host-only Adapter
- Name: Vboxnet0
- Advanced:
- Promiscuous mode: Allow VMs
- La opción de Cable connected se mantiene seleccionada.
- Adater 3:
- Attached to: NAT
- Advanced:
- La opción de Cable connected se mantiene seleccionada.
We also had to configure the /etc/network/interfaces file like this:
Move the VirtualBox VM to a new location
Move VirtualBox folder with virtual machines to a new location
https://4sysops.com/archives/move-virtualbox-folder-with-virtual-machines-to-a-new-location/
Move the virtual disc .vdi to a new locatiion
https://dirkstrauss.com/moving-virtualbox-vm/
Algunos errores
A start job is running for raise network interfaces (5 mins 1 sec) in ubuntu16.04:
https://ubuntuforums.org/showthread.php?t=2323253
VMware Virtualization


