Networking
El material del curso puede ser desgargado aquí: http://goo.gl/jj5p8s
Contents
- 1 Contenido del semestre 3
- 2 Para ver las características de las tarjetas de red (network card)
- 3 Desplegar las características de la conexión a internet
- 4 Network simulation using Cisco-PacketTracer
- 4.1 Cisco - PacketTracer
- 4.2 Terminología
- 4.3 Lab 1: Configuring Wireless Access and Security
- 5 Internet
- 6 Binarios
- 7 Definición de una subred
- 8 Protocols
- 9 TCP/IP
- 10 Wireless LANs (WLANs)
Contenido del semestre 3
Wireless network equipment
Router hardware
Router configuration
Wide Area Network protocols
Introduction to routing – static and dynamic
Remote network access
Para ver las características de las tarjetas de red (network card)
http://www.linuxnix.com/find-network-cardwiredwireless-details-in-linuxunix/
Tales como: Name of network cards, Network card link status, Network card speeds, Network card MAC address, Network card IP address, Network card driver details, Network card manufacture details, Network card duplex/half duplex details, Network card auto-negotiation details, Complete network card capabilities details, Complete network card hardware details
sudo lshw -c network
Desplegar las características de la conexión a internet
IP address
Dirección IP
IP Privado
ifconfig
ifconfig
IP Público
curl ipinfo.io/ip
Subnet mask
Broadcast address
https://www.techopedia.com/definition/2384/broadcast-address
Gateway
El comando route: http://www.thegeekstuff.com/2012/04/route-examples
route
Internet speed via terminal
https://askubuntu.com/questions/104755/how-to-check-internet-speed-via-terminal
La velocidad de la conexión Internet se puede medir en kbit/s (Download/Upload)
Podemos usar el siguiente script en línea:
curl -s https://raw.githubusercontent.com/sivel/speedtest-cli/master/speedtest.py | python -
o instalar el programa usado en la linea de comando anterior (speedtest-cli) como se explica aquí: https://fossbytes.com/test-internet-speed-linux-command-line/
sudo apt-get install python-pip
pip install speedtest-cli
To test internet speed, just type the following command and press enter:
speedtest-cli
You can find various options in the help section of the utility:
speedtest-cli -h
Display the internet speed in megabytes/sec:
speedtest-cli --bytes
También podemos obtener una medida a través de wget:
wget -O /dev/null http://speedtest.wdc01.softlayer.com/downloads/test10.zip
Desplegar la ruta de un paquete enviado en Internet
El comando traceroute permite optener la ruta de un paquete enviado.
traceroute google.com
En el ejemplo anterio podemos ver que el paquete pasa por el IP 109.255.255.254 (que debería ser el Gateway de mi ISP). En la página que muestro a continuación se pude ver que dicho IP pertenece a mi ISP y está ubicado en Cork.
Who is my ISP
Esta muestra el ISP: https://www.whoismyisp.org/
Network simulation using Cisco-PacketTracer
Cisco - PacketTracer
https://www.netacad.com/courses/packet-tracer-download/
Packet Tracer is a powerful network simulation program which allows students to experiment with network behavior. It supplements physical equipment in the classroom by allowing students to create a network with an almost unlimited number of devices, encouraging practice, discovery and troubleshooting.
Intalación en Ubuntu
sudo ~/Downloads/PacketTracer70/./install
Luego de instalarlo encontré el error descrito y solucionado aquí: https://forum.ubuntu-fr.org/viewtopic.php?id=2014677
J'ai complété l'installation du logiciel puis j'ai essayé de me rendre dans le tableau de bord( dash) pour y trouver le logiciel où il ne se trouvait pas. Par ligne de commande, j'ai essayé de taper : packettracer et cela me dit simplement: "Starting Packet Tracer 7.1" et ne fait plus rien ensuite.
Donc tu ouvres un beau terminal, et tu lances :
/opt/pt/bin/PacketTracer7
Quand j'accède au fichier pour ./PacketTracer7: error while loading shared libraries: libQt5Script.so.5: cannot open shared object file: No such file or directory
Instalar:
libqt5script5
Je viens de le faire mais à l'instant mais ça ne résous pas mon cas,
je suis retourné voir le fichier /opt/pt/bin/PacketTracer7 et quand je l'ouvre, il m'indique qu'il me manque la librairie : " libQt5ScriptTools.so.5" j'ai donc essayé de refaire la même chose que précédemment en l'adaptant à la librairie , donc je tape :
sudo apt-get install libqt5scripttools5
Et maintenant, ça fonctionne quand je vais chercher le fichier /usr/pt/bin/PacketTracer7
Luego para porder launch a través de packettracer in a terminal:
sudo ln -s /opt/pt/bin/PacketTracer7 /usr/local/bin/packettracer
Terminología
WAN
A Wide Area Network is a telecommunications network or computer network that extends over a large geographical distance. https://en.wikipedia.org/wiki/Wide_area_network
LAN
A Local Area Network is a computer network that interconnects computers within a limited area such as a residence, school, laboratory, university campus or office building. https://en.wikipedia.org/wiki/Local_area_network
Puertos
- The wireless router’s WAN (Internet) port (el puerto WAN (Internet) del wireless router).
- The wireless router’s LAN (Ethernet) ports.
- RS-232: is a standard for serial communication transmission of data. https://en.wikipedia.org/wiki/RS-232
Elegir el puerto correcto
- Cuando se conecta un cable a una PC en Packet Tracer, el programa propone (por defecto) conectarlo al puerto FastEthernet, USB o RS-232. Hasta ahora hemos estado usando el puerto FastEthernet.
- Cuando se conecta un cable a un Router, PacketTracer propone el puerto Internet o Ethernet. Creo que el puerto Internet se usa cuando estamos conectando el Router con una WAN y el Ethernet es para una LAN.
Cables
- Crossover cable:
- From a PC to the wireless router’s WAN (Internet) port.
- Straight through cable:
- From PC to one of the wireless router’s LAN (Ethernet) ports.
Algunas configuration using PacketTracer
- Set the IP configuration on a PC to DHCP by clicking on the desktop tab, then selecting the IP configuration icon.
- Verify connectivity settings: On a PC, verify the connectivity settings by going to Desktop and clicking on command prompt. At the command prompt, type the command ipconfig to view your network device information.
- If the PC does not receive an IP address in the command prompt type ipconfig /renew, this will force the PC to request an IP address from the Router.
Lab 1: Configuring Wireless Access and Security
In this lab, you will configure a Linksys WRT300N (https://en.wikipedia.org/wiki/Linksys_routers#WRT300N) in Packet Tracer.
Cofigurar la conección entre el Router y la WAN / LAN
Setup the device topology diagram
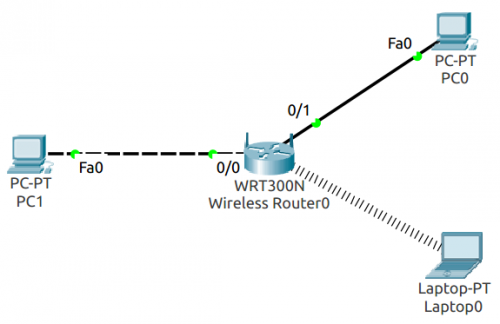
- Setup the devices as shown in Figure Figure 1:
- PC1 will be acting as the Internet connection
- PC0 and Laptop0 will be in our LAN.
- Connect a crossover cable from PC1 to the wireless router’s WAN (Internet) port and connect a straight through cable from PC0 to one of the wireless router’s LAN (Ethernet) ports.
- Podemos pensar en esta configuración de la siguiente forma: el Wireless Router podría ser el AC de nuestra home network; al cual hemos conectado una PC0 a través de un cable y nuestra Laptop a la Wireless Network. PC1 representa cualquier PC fuera de nuestra LAN.
Configurar la conexión de PC1 y PC0
NOTA: Normalmente deberíamos configurar el Router antes de los dispositivos en la LAN. Esto porque el DHCP Server del Router asignará los IP's a nuestros dispositivos en la LAN; y las confuguraciones en el Router afectarán, por supuesto, las IP's otorgadas a los dispositivos. Sin embargo, a manera de ejercicio, y con el fin de destacar ciertos detalles, vamos primero a realizar las configuraciones en los dispositivos dentro de la LAN.
- PC1 will be acting as the Internet connection, so we need to set the IP address, subnet mask, and default gateway statically as listed in Table 1.
- Set the IP configuration on PC0 to DHCP by clicking on the desktop tab, then selecting the IP configuration icon.
- The wireless router will provide an IP address to the PC0 using the default DHCP configuration.
- Verify connectivity settings for PC0: Go to Desktop and click on command prompt. At the command prompt, type the command ipconfig to view your network device information.
- If the PC does not receive an IP address in the command prompt type ipconfig /renew, this will force the PC to request an IP address from the Router.
- Notice which IP address is the default gateway. This is the default IP address of a Linksys WRT300N. Por tanto, el Router a asignado un IP a PC0 a través de la configuración por defecto (ver Nota al inicio de esta sección).
Configurar el Router
Click on the Wirelessrouter0 and select the Setup tab for the wireless router’s GUI.
Log in
In the real world the default login credentials are a username admin and a password of: admin. Note that this is very insecure since it is the factory default and provided publicly. You will set our own password in a later task.
Configure the WAN interface
Normally an Internet Service Provider would use DHCP to give out addresses to the WAN port. For this lab, you will assign the address statically.
- Configure the WAN port to have a static IP address:
- From the Internet Connection Type pull-down menu, select Static IP and set the IP address settings for Internet Setup:
- Internet IP Address - set to: 172.17.88.35
- Subnet Mask: 255.255.255.0
- Default Gateway - set to the ISP address: 172.17.88.1
- From the Internet Connection Type pull-down menu, select Static IP and set the IP address settings for Internet Setup:
Configure the LAN IP addressing
- Set the Network Setup Address:
- Under Network Setup, enter the Router IP of 172.17.30.1 / Subnet Mask: 255.255.255.0
- NOTE: At this point you would be disconnected from the web page if you were configuring from a PC, as you just changed the IP address you are connected to. It would take a minute or two, and you would need to refresh your browser, but you should be redirected to the new URL of the web utility. If not, you would need to release your IP address and request a new one, before your navigate your browser there. You would be asked to login again.
- Under Network Setup, enter the Router IP of 172.17.30.1 / Subnet Mask: 255.255.255.0
Verify IP address changes:
La configuración de la LAN IP addressing en el Router, afectará, por supuesto, la IP Address que el DHCP Server del Router asígnará a las PC's de la LAN. Para observar dichos cambios vamos al Command prompt de PC0 y ejecutamos: ipconfig /release ipconfig /renew
Luego de esto, note la nueva IP asignada por el DHCP Server del Router.
Verify connectivity
Ping the WAN IP Address of the Wireless Router (172.17.88.35) to verify you can get to the outside of your network. The pings should succeed. If you try to Ping PC1 172.17.88.1, it may fail if your firewall won’t allow replies back in.
Wireless wettings
Basic wireless wettings on the Routher
The Linksys WRT300N allows you to choose which network mode to operate in. Currently, the most common network mode for clients is Wireless-G and for routers is BG-Mixed. When a router is operating in BG-Mixed, it can accept both B and G clients. However, if a B client connects, the router must scale down to the slower level of B. For this lab, pick the fastest speed your clients can support.
On WRS1, navigate to the Wireless page:
- Set the Network Name (SSID) to WRS_1
- Wireless-N Only – Radio Band – Change to Standard – 20MHz Channel.
- Standard Channel – Leave at default
- SSID Broadcast – Leave Enabled for now.
Incorporar una Wireless Network Card a la Laptop
Por defecto, Packet Tracer no incorpora una Wireless Network Card (en este caso compatible con Linksys WRT300N) a la Laptop. Debemos entonces incorporar una antes de intentar hacer la Wireless conection.
Si intentamos verificar la conexión en la Laptop antes de incorporar la Wireless Network Card:
- Go to the Desktop tab then select the PC Wireless Icon.
... el programa desplegará el siguiente mensaje: «A WMP300N or WPC300N wireless interface is required to connect»
Para incorporar la Wireless Network Card:
- Click on the Laptop > Physical
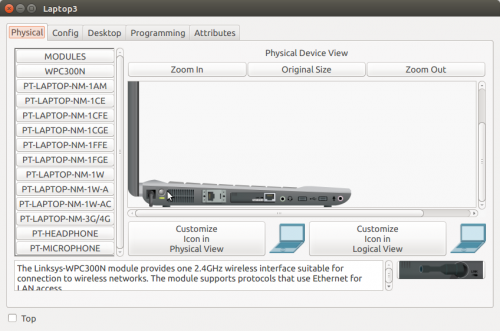
- Observar el diseño de la Laptop (observar los diseños de los dispositivos que presenta la Laptop) (Figure 2)
- Note que la Network Card corresponde a un puerto FastEthernet.
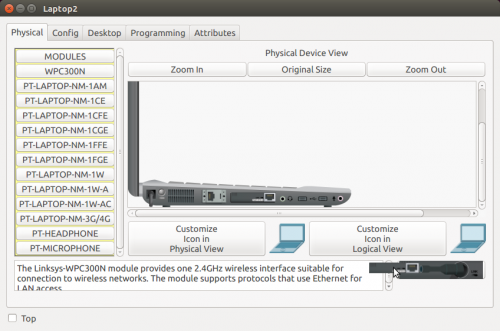
- Antes de realizar el cambio, debemos apagar la Laptop. Para esto haga clic en el botón que se encuentra al lado de la conexión electrica. Arriba de la luz verde que simboliza que el dispositivo se encuentra encendido. Note que luego de prescionarlo desaparece la luz verde, lo cual indica que el dispositivo se encuentra apagado. (Figure 2 and Figure 3)
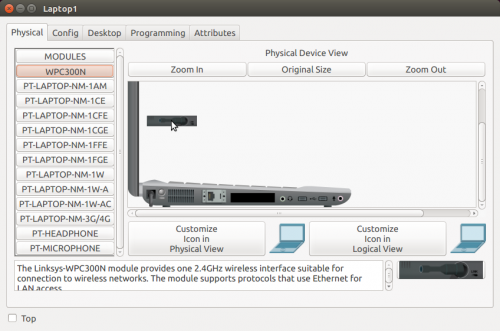
- Utilizando el cursor del mouse, arraste la actual tarjeta de red (FastEthernet) hacia la esquina inferior derecha, hacia el espacio en donde se muestra el diseño de los dispositivos físicos. Note que si se ha arrastrado correctamente, el espacio en donde se encontraba la tajeta de red en la Laptop quedará libre. (Figure 3 and Figure 4)
- Ahora arrastre la tarjeta que desea instalar desde las distintas opciones que se encuentran en el panel a la derecha hacia el espacio libre en la Laptop. (Figure 4)
- En este caso debemos escoger una WPC300N. (Figure 4)
Verify wireless connection
Ahora que hemos incorporado una Wireless network card a nuestra Laptop, podemos entonces verificar la Wireless connection:
- Go to the Desktop tab then select the PC Wireless Icon. Click on the Connect Tab.
- If necessary, you may have to click on Refresh to update your wireless networks. You should see the new network (WRS_1).
- Click on the name to highlight it and then click Connect. Click on the Link Information Tab. When it is done, it will congratulate you on creating a profile (Message: You have successfully connected to the access point).
Configure DHCP Settings
Give a static DHCP binding to PC0 and Laptop0
- On Laptop0, verify connectivity settings going into cmd. At the command prompt, type the command Ipconfig /all to view your network device information. Note the Physical Address (MAC) of the Wireless Connection.
- On the Router, navigate back to the Setup page (the Basic Setup is the default tab). In the middle of the Basic Setup Page, under DHCP Server Settings, click the DHCP Reservations button. Una nueva ventana se abrirá...
- There are two ways to assign DHCP addresses:
- The first method will always assign the client the same address the client has right now.
- Find PC0 by its MAC address in the list of current DHCP clients (Hint: it should be listed as a LAN connection)
- Check the Select box next to your PC. Click Add Clients. Now PC0 will show up under Clients Already Reserved.
- This gives PC0 (in this example, the computer with a MAC address of 00:60:5C:D9:2D:1D) the same IP address it has right now (172.17.30.100) whenever it requests an address through DHCP.
- The first method will always assign the client the same address the client has right now.
- The second method to assign DHCP addresses is to select the address you want the machine to get. You will assign Laptop0 the static IP address listed in the Addressing Table, not the one it received initially.
- Under Manually Adding Client, enter your client’s actual name (puse Laptop0 aquí pero no estoy seguro) , .24 for the IP address, the actual MAC address of your PC’s Wireless Connection, and click Add. Now whenever Laptop0 connects to the wireless router, it receives the IP address 172.17.30.24 via DHCP.
- The second method to assign DHCP addresses is to select the address you want the machine to get. You will assign Laptop0 the static IP address listed in the Addressing Table, not the one it received initially.
Verify the static IP address change and conection
On both PC0 and Laptop0, at the command prompt, type:
Ipconfig /release
Ipconfig /renew
... to verify the IP addresses you assigned are used. On Laptop0, ping the IP address of the WAN port to verify you can reach the Internet.
Configure other DHCP server settings
Right underneath the DHCP Reservation are the other settings for the DHCP server.
What is the default maximum number of users the WRS300N will hand out DHCP addresses to?
- 50 users.
- Start IP Address - Change to: 172.17.30.50.
- Maximum Number of Users - Change to: 75
These settings give any PC that connects (wired or wirelessly) to this router requesting an IP address through DHCP, an address between 172.17.30.50–124. Only 75 clients at a time are able to get an IP address and they can only have the address for 24 hours, after which time they must request a new one.
Internet
Binarios
Conversión de un número en el sistema decimal al binario:
Conversión de Binario a decimal:
Definición de una subred
A través de la Máscara de subred se define que IPs forman parte del la misma Red (directa)
La notación 192.160.136.4/24 define una máscara de subred en donde los primeros 24 bits son 1 --> 255.255.255.0
Protocols
Think of protocols as a standard way of communication between a client and a server.
TCP/IP
https://en.wikipedia.org/wiki/Internet_protocol_suite
The Internet protocol suite is the conceptual model and set of communications protocols used on the Internet and similar computer networks.
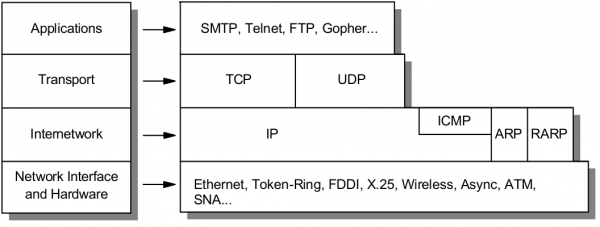
The Internet protocol suite provides end-to-end data communication specifying how data should be packetized, addressed, transmitted, routed, and received. This functionality is organized into four abstraction layers which classify all related protocols according to the scope of networking involved. From highest to lowest, the layers are:
- The application layer: it provides process-to-process data exchange for applications. HTTP, FTP, DNS etc.
- The transport layer: handling host-to-host communication. TCP, UDP, etc.
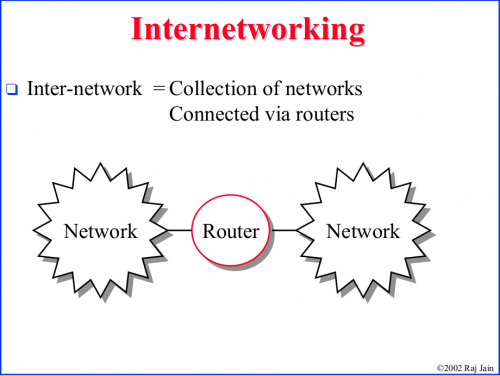
- The internet (Internetwork) layer: providing internetworking between independent networks. IP (IPv4, IPv6), etc.
- Network interface and Hardware [Datalink, Physical] layer: containing communication methods for data that remains within a single network segment (link). Ethernet, Wireless, etc.
Applications
HTTP
The HTTP request. HTTP is the pull protocole. A client pulls a page from the server.
FTP
DNS
Transport
TCP
TCP (Transmision Control Protocol)
Internetwork
IP
Network interface and Hardware [Datalink, Physical]
Ethernet
Wireless
Wireless LANs (WLANs)
A WLAN is a Wireless Local Area Network, which is the linking of two or more computers without using wires. Instead, radio waves and IEEE 802.11 are used to communicate.
WLANs use infrared light (IR) or radio frequencies (RFs). The use of RF is far more popular for its longer range, higher bandwidth, and wider coverage.
Access point
The Access Point (AP) is the central node in 802.11 wireless implementations. It is the interface between wired and wireless network
An access point is a hardware device that receives data by wired Ethernet and, using 2.4GHz or 5GHz radio waves bands, converts to a wireless signal. It sends and receives wireless traffic to and from nearby wireless clients.
For a home environment, most often you have a router, a switch, and an AP {\it embedded in one box}, making it really usable for this purpose.
Wireless technologies
- PAN/WPAN (Personal Area Network (PAN)/ Wireless Personal Area Network (WPAN)
- Bluetooth, IEEE 802.15.4
- LAN (Local Area Network)
- IEEE 802.11
WLAN Components
- Wireless Client Receiver: it is needed to connect a computing device (e.g. desktop, laptop, PDA…) to the wired networked via an access point. It includes Onboard Cards (most laptops) PCMCIA, PCI card or USB adaptor
- Access points (APs): they are needed only in the Infrastructure Mode of WLANs. They provide the wireless client with a point of access into a network. They are like Ethernet switches in a wired network and operate in half-duplex mode (e.g. They either receive or transmit at any given time).
The WLAN supports four Network Topologies
- Peer-to-peer (Ad hoc) Topology
- Hybrid Topology
- Infrastructure Topology
- Point-to-point Topology
802.11 standards
- 802.11 is the generic name of a family of standards for wireless networking.
- Popular 802.11 standards include 802.11a, 802.11b, 802.1g, 802.11n, 802.11ac (Newest)
Some EEE 802.11 standards are:
| Standard | Frequency band | Max speed |
| 802.11 | 2.4 GHz | 2 Mbps |
| 802.11a | 5 GHz | 54 Mbps |
| 802.11b | 2.4 GHz | 11 Mbps |
| 802.11g | 2.4 GHz | 54 Mbps |
| 802.11n | 2.4 or 5 GHz | 600 Mbps |
| 802.11ac | 5 GHz | 1 Gbps |
